The shower is one of the most important areas of our homes that we use daily. Imagine if your shower stopped working – it would be very difficult to take a refreshing shower after a long day at work.
In this blog post, we’ll explain how to properly lubricate a shower valve and also how to loosen a tight shower handle.
Hopefully, this will help make your showers run more smoothly!
5 Easy Steps To Lubricate Shower Valve
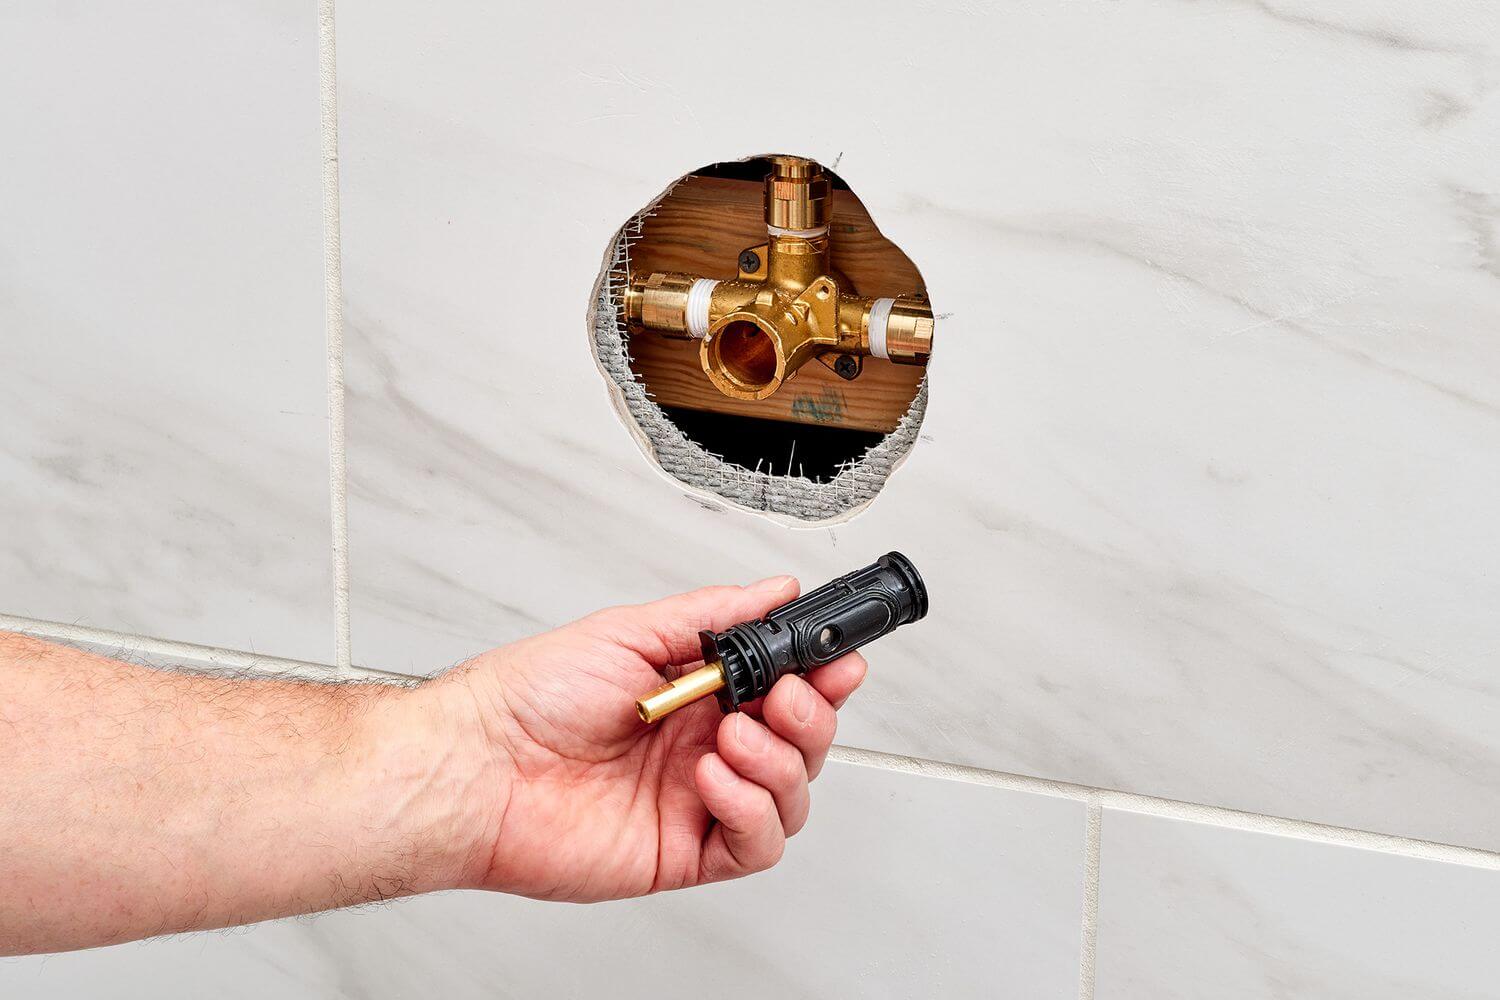
- The first step to lubricating the shower valve is to turn off the water supply. Once that has been done, you can then remove the handle and cover plate of your tub or shower faucet.
- After doing this, use a plumber’s grease to lubricate all parts of the valve stem and its components. Make sure to apply a thin layer of grease for it to properly spread throughout the valve.
- To loosen a tight shower handle, start by applying some penetrating oil such as WD-40 onto the base of the handle and let it sit for a few minutes. Then, using an adjustable wrench or channel locks, begin to gently twist it back and forth until you can feel it starting to give some slack.
- You may need to apply some more oil if the handle is still stuck. Once you’ve loosened up the handle, carefully tighten it back down using a screwdriver or wrench.
- After properly lubricating and/or loosening your shower valve, turn on the water supply and test out your newly repaired shower valve! Hopefully, now your showers will run smoother than ever before.
If not, don’t hesitate to contact an experienced professional plumber. Taking good care of your plumbing fixtures is key to maintaining a healthy, functioning home environment. With these tips in mind, you can have peace of mind knowing that your showers are running smoothly once again!
How to identify the type of valve in your shower?
Identifying the type of valve in your shower can be quite tricky. It is important to know what type of valve you have as different valves may require different maintenance or replacement parts.
Here are a few steps to help you identify the type of valve in your shower:
1. Inspect the visible components
Look at any exposed pieces and try to note down any identifying labels or names on them.
This could include the manufacturer’s name, model number, etc. Most commonly used valves will have their brand name printed somewhere on their surface.
2. Measure the size of the valve
Take out a measuring tape and measure both the length and width of the pipe around your valve. The measurements taken should match those required for the type of valve you’re looking for.
3. Look at the shape and design
Most valves have distinct shapes that differentiate them from one another. Check if your valve has any unusual or out-of-the-ordinary features or designs that might identify it with a particular type of valve.
4. Troubleshoot to find out
If all else fails, you can take a few steps to troubleshoot and try to identify the type of valve in question. A good place to start would be to open up the shower system, look for signs of wear and corrosion on the components, check the water pressure and flow rate etc.
Based on these observations, you may be able to narrow down the search for a specific type of valve.
Once you have identified the type of valve, it is important to ensure that all necessary maintenance and replacement parts are easily available for the same.
You can even consult a professional plumber or technician in case you need further assistance. Knowing the type of valve in your shower will make sure that any future repairs or replacements are done quickly and safely.
The above steps should help you identify the type of valve in your shower. Always remember to contact a professional if you require further assistance and make sure that all necessary maintenance and replacement parts are readily available for the same.
With the appropriate knowledge, you can keep your shower running safely and efficiently!
How to properly lubricate a shower valve?
To properly lubricate a shower valve, you will need to turn off the water supply and remove the existing handle.
Use a screwdriver to remove the trim plate from around the valve. Using a pair of slip-joint pliers, loosen the packing nut and take out any old washers or gaskets that you find inside.
Once these components have been removed, use an all-purpose lubricant with a silicone base such as WD-40 to lubricate the entire valve stem assembly including the packing nut, rubber washer and threads on both ends of the stem.
Allow it to soak for 10 minutes before reassembling everything back together in reverse order. Make sure all parts are tightly fitted together before turning on your water supply.
Now your shower valve should be properly lubricated and ready for use!
Importance Of Lubricating Shower Valve
Lubricating a shower valve is important because it helps ensure that the various components of the valve are operating smoothly and efficiently.
- Lubrication of a shower valve helps to reduce friction and wear on the parts that move when turning the water on or off. This helps to extend the life of the valve and prevent it from becoming worn out too quickly.
- It also helps to keep the seal tight, preventing any leaking which can result in higher water bills and wasted resources.
- Regular lubrication is important for the smooth operation of a shower valve so that it functions properly with no sticking or squeaking when you turn it on or off.
- Lubricating a shower valve can also help to reduce corrosion over time since lubricants are designed to repel moisture which can cause rusting and other issues.
- Finally, lubricating a shower valve helps to keep it running smoothly and efficiently so that you can enjoy a hot shower without any annoying issues or delays. This will help to make your bathroom experience more enjoyable and comfortable.
By properly lubricating your shower valve regularly, you can ensure that it lasts longer, operates more smoothly and consumes less energy in the process! It’s a simple task with great benefits for both you and your home.
So make sure to give your shower valve some much-needed love by lubricating it every once in a while! It’s worth the effort!
Tips for avoiding common problems with shower valves?
- Check that the shower valve is an appropriate size for the water supply, as too small size will not provide adequate pressure or water flow.
- Make sure to clean any debris and sediment from the valve regularly to avoid clogs and blockages in the pipes or faucets.
- Replace worn-out washers or seals on the valve to stop leaking and ensure proper operation of the system.
- Lubricate all moving parts with silicone lubricant regularly to prevent sticking and corrosion.
- Ensure that there are no air leaks around the valve, as this can cause low water pressure and inefficient flow rates within the system.
- Replace the entire valve if necessary, as it may malfunction or not provide sufficient water pressure.
- If a diverter is installed in the shower, make sure to check it regularly for clogging and other issues that can cause low water pressure or improper operation of the valve.
- Keep an eye out for any signs of corrosion on the valve or within the system, as this can indicate a more serious issue with your plumbing.
- Make sure to test all connections with a screwdriver and adjust them if necessary to ensure they are secure and properly connected.
- If the handle is hard to turn, make sure to check for any mineral deposits or corrosion that could be causing it to stick. This can usually be cleared away by using a cleaning solution and a scrub brush.
- Make sure all connections are tight and secure, as loose connections will eventually lead to leaks in the valve or piping system.
- Look out for any signs of moisture around the shower valve, as this can indicate a leak which needs to be fixed immediately before it gets worse.
FAQs – Lubricate The Shower valve
How do you fix a sticky shower valve?
The best way to fix a sticky shower valve is to first identify the cause of the issue. Common causes include mineral deposits, corrosion and old seals.
If minerals are the cause, you can clean them out with vinegar and a brush. If corrosion is the issue, an acid-based cleaner should be used.
Old seals should be replaced by purchasing a new shower valve, as it is difficult to repair them on your own without specialized tools.
To ensure the best outcome, it is recommended to hire a professional plumber. They will be able to identify the cause of the issue and provide the correct solution.
Can you use Vaseline instead of plumbers grease?
Vaseline is not an appropriate substitute for plumber grease. Plumber’s grease is a heavy-duty lubricant specially formulated to protect plumbing and metal surfaces from corrosion, reduce friction and prevent seizing. Vaseline is petroleum jelly that is used to soothe skin and protect against minor cuts and abrasions.
While Vaseline may help lubricate a plumbing joint or valve, it will not provide the same level of protection as a plumber’s grease.
Plumbers’ grease is much thicker and more resistant to water, which makes it ideal for plumbing applications.
Why is my shower handle so hard to turn?
If your shower handle is hard to turn, it could be caused by a few different things. One possible cause may be sediment build-up within the valve. Mineral deposits can build up over time and make it difficult to turn the handle.
Another cause may be a problem with the internal parts of the valve. Internal parts can become worn over time and cause the handle to stick or be difficult to turn. If it is a cartridge-style valve, the cartridge may need to be replaced.
Finally, if the handle is loose on its base or if the valve stem is loose in the wall, it can cause the handle to be hard to turn.
Consequence
If your shower valve is sticking, you can use a few easy methods to fix it. First, try using WD-40 or another lubricant on the valve. If that doesn’t work, you can remove the handle and clean out any debris that may be preventing it from moving smoothly.
Finally, if the problem persists, you may need to replace the entire shower valve. Whatever method you choose, make sure to follow the manufacturer’s instructions carefully to avoid damaging your plumbing.
With a little patience and effort, you should be able to get your shower running smoothly again in no time!
Good luck and happy showering!

